Monday, October 31, 2011

Pumpkin Cupcakes with Cream Cheese Icing

I love pumpkins. I love the way they look and taste and all the fun things we get to do with them this time of the year. I was looking in my pantry and the 6 jars of pumpkin I had were right there in my face. I decided to look online to see if I could find a recipe that I wanted to try. I couldn't find anything that looked really good that was easy and that my whole family would like. So I got creative and made up my own recipe.
This is my cute little pumpkin.

Pumpkin Cupcakes
Preheat oven to 325degrees
1 Yellow cake mix (use applesauce instead of oil and then add the rest of the ingredients on the box)
1 tsp cinnamon
1 tsp ground nutmeg
1 tsp all spice
1 tsp vanilla extract
1 15 oz can of pumpkin
mix everything together until well blended. Make sure you scrape the sides of the bowl to get everything mixed in properly.

Fill cupcake wrappers almost to the top with the batter. They won't rise as high as regular cake so you need to make them pretty full to get a nice dome top on the cupcakes.

Bake for 25 minutes. Be sure to check to see the inside of the cupcakes are done with a toothpick. Place on a wire rack to cool.

Cream Cheese frosting
1 1/2 8oz fat free cream cheese (softened)
1 cup butter (softened)
3 cups sifted confectioners sugar
1 tsp Vanilla extract

Cream butter, cream cheese and vanilla extract until smooth. Add sifted confectioners sugar 1/2 cup at a time so it doesn't explode in your face. Once everything is mixed in well and you've scrapped the sides of the bowl to get everything blended turn the mixer on medium speed for 5 minutes. It will whip it and give it a nice consistency.

Once your cupcakes are cool you can add your icing. I just spooned mine on but you can pipe it through a cake decorating bag if you would like. Keep refrigerated. Give them a try and let me know what you think. They are super moist and delicious.

I wanted to take a picture of the cupcakes but they didn't last long enough. I'll take a picture as soon as I make another batch.

Thursday, October 27, 2011

Sweetest Friend


I showed this card to my husband and he said "Oh it's a flower" NO! It's a lolly pop. What do you all think? Does it look like a lolly pop? I used two different shades of pink yarn and glued it to a circular piece of cardstock.  I twisted the yarn while I wrapped. Then I used a piece of twine for the lolly pop stick.


I was really excited about this card until my husband thought it was a flower. What do you all think? Does it look like a lolly pop or a flower?

Tuesday, October 25, 2011

DIY Cloth pull-ups

A few weeks ago I was at the store buying pull ups and I had an epiphany. I was trying to figure out a way to save money on Pull Ups when it hit me to make some out of cloth. People use cloth diapers so why not cloth Pull Ups right?

I came home and searched on Pinterest and found just what I was looking for. There was already a tutorial made HERE.

I used the same pattern from the blog. I purchased it on Etsy from That Darn Kat.

I unfortunately don't have a Serger so I just sewed the underwear with a straight stitch and then a zig zag stitch around the edges. That way it gave it a nice finished seam.


I made six pairs. All of them look the same. I used the girl pattern instead of the boy because it was easier to add my layers of flannel and the waterproof material. My three-year-old looks so cute in them but I don't want to post pictures of my little boy in his underwear on the Internet.


I also used Ribbing on the waist band and legs instead of the Interlock Knit material. I got all the supplies from Joanns. It cost me about $20.00 and I have material left over. The pattern cost me about $10.00. We are still going to use the pull ups at night because he pees so much during the night but this has eliminated his use of pull ups during his nap and he doesn't poop in these. He didn't have a problem pooping in the Pull Ups because they were more like a diaper.

Sunday, October 23, 2011

DIY: Up-cycle Halloween Costume

I got this idea from pinterest. My husband and I just made a few changes of our own. This costume didn't cost us a thing. We only used things that we had at home. My three year old son is so excited! It was hard to get a picture because he was running around all over the place.


You will need:
  • Cardboard
  • Two plastic bottles
  • Duct Tape
  • Orange Tissue paper
  • 2in non-rolling elastic
  • screws
  • Fuses
  • Metallic Metal spray paint
  • An adorable 3 year old
  • Hot glue gun
  • Scissors
  • crafting knife and mat
  • Rubber Cement
It really didn't take us very much time. First we spray painted the cardboard and the water bottles. Then we made the vent out of cardboard. I just traced a circle and then drew lines every 1/4 inch and cut part of the cardboard out. I spray painted the vent as well when I was finished. Cut out the bottom of both bottles after they are painted. Next we used screws to attach the vent to the water bottles. The water bottles were then hot glued to the cardboard wings. I used rubber cement to add the tissue paper flames. We hot glued the fuses onto the cardboard vent. We kept the bottom of the bottles and used them as embellishments on the wings. The hose at the top is just duct tape. Attach the elastic to the back of the wings in an X pattern.

Even if you have a Halloween costume picked out for your kiddo this is a great fun project you can do for your kiddos. He is so excited to play with it again. The best part is we didn't have to pay anything for it and it is a good way to up-cycle some things you would have just thrown away.

Wednesday, October 19, 2011

Wedding Card

I made this card for my friend who is getting married very soon. I'm sad I can't see her in person on her special day.
For this card I use patterned paper for the front. I took a brown ink pad and rubbed it along the edge of the patterned paper to distress it a little. Then I took a white 1 inch strip of cardstock and cut it at 1, 1.5 and 2 inches. Instead of using a rounded corner punch I used a pair of scalloped decorative scissors to give the two top corners a small rounded edge. Then I took each piece and embossed it with my cuttlebug machine.
Just add your ribbon. I used THIS method. I finished it off with a small script Cherish sentiment.
What do you think? Pretty snazzy right?

Monday, October 17, 2011

Happy Halloween Treats

I love Halloween. It is so much fun. Every year we make these chocolate covered pretzels. They are really yummy and festive. You just need the pretzel mold from Joanns and some melting chocolate and pretzel rods. I also made the tags. The stamp is from Joanns.

I sent them with Jeff to work. He said they were a hit.
I used an ink pad to distress the edges of the white cardstock.


You can get the clear bags at Walmart or Joanns as well. They are called Pretzel bags. They come with twisty ties too!


Happy Halloween!

Saturday, October 15, 2011

I Spy Quilt


 About a year ago I got together with some friends to do a block swap. What you do is make 20 of the same block and then you exchange it with your friends. You will end up with 20 different blocks in the end. 


We decided on a Summer theme before we bought our fabric.

 It was really fun seeing what everyone came up with. I also love that when I look at each block I think of my friends.


I can't take full credit for this quilt. I didn't come up with the idea. I just participated and my wonderful Mom pieced the top for me and machine quilted it. 

Sorry about the bright light in the picture. There aren't many places I can take pictures in my apartment.

This is the backing. I love this fabric. I got it at Joanns.

Austin loves to play with this quilt. We lay it on the floor and I will tell him things to look for. Bennett also likes to have his tummy time on it. There are a lot of wonderful things to look at. Thanks to all my friends.

Friday, October 14, 2011

DIY: Drawstring Bags


Aren't these cute? I really can't take credit for the idea. I found a great tutorial HERE


The tutorial was very easy to follow. I used some cording for the drawstring instead of making my own. You can get the cording by the yard at Joanns. 


I have been making little activity bags for my toddler. These will be perfect to keep them in. 


When I showed my husband the bags he said. "Wow they are linned, they will last forever."


I plan on making a bunch more in different sizes. My toddler loves to put things in them and carry them around.

Thursday, October 13, 2011

Bow Tutorial Part 2

Did you try tying the bow from yesterday? This next one is a littler harder to demonstrate. Again it will be easier for you to use ribbon that is the same on both sides.

Again... leave the ribbon on the spool.
Open your card with the front of the card facing up...towards you. Lay your ribbon underneath the cardstock.
Start just like you did with the first bow. You will be tying a bow just like you would tie your shoes. I always keep the shorter length of ribbon on the top.
Wrap the short piece under the long one.
Make a loop in the short piece. (Bunny Ear)
Wrap the longer piece around the loop of the short piece.
Push the longer piece of ribbon through the hole... under the short loop.
Pull it through and adjust the ribbon. I make the loops the size I want and I pull on the loops to make the bow tighter.
Almost finished. Now you will want to finish the ends. You can either cut the tails at an angle like you did for the first kind of bow or....
Fold the tail in half lengthwise (hot dog)
Hold you scissors at an angel. Notice how the scissors are angled towards the fold.
Cut the ribbon. This is what the tail will look like.
This is the piece that you cut off. If the tail on your bow looks like this then you need to angle your scissors differently.

All done!!! If you have any questions feel free to leave me a comment. I hope this made sense. It was harder then I thought it would be to explain how to die a bow. Good luck and happy tying!


Wednesday, October 12, 2011

Card Bow Tutorial

As requested I am posting a tutorial so you can tie the bows you've seen on my cards. There are several different ways to tie bows. I like the two that I am showing you the best. They are easy to do. I've taken step by step pictures...which wasn't easy by the way. I had to tie the bow with one hand and hold the camera in the other.

Helpful hint...Use ribbon that is the same on both sides. If there is a print on one side it is a little trickier to get the print facing the way you want it.

Ok Lets get started. I'll start with the method that saves the most ribbon.
Both of these cards use this method.
Notice how the ribbon is tucked between the embossed paper and the card base.
The ribbon can not be seen on the inside of the card. Even if that white piece of paper wasn't on the inside you still wouldn't be able to see the ribbon. Got it?
 
When I tie my bows I tie it with the ribbon still on the spool. I don't cut a piece off. It wastes less ribbon and it is easier then trying to guess how much you will need for your project.
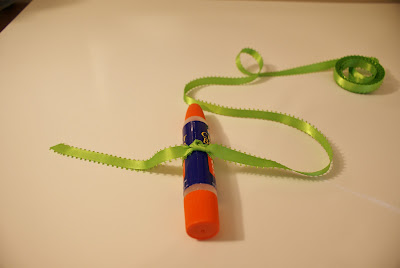
I use this glue stick to tie my ribbon around. You can use a regular glue stick or pretty much anything else that that a similar shape.
Confused?  You are just tying a double knot.
Pull the glue stick out.
This is what it will look like.
Cut it off from the rest of the spool of ribbon.
Use scissors to cut the center of the loop at an angel.
See?
This is what it will look like
Sometimes I pull it tighter or adjust it a little. Just tug on the short part of the ribbon.
Use double sided tape to stick it to the cardstock.
wrap the extra ribbon around the back and glue the cardstock to your card base.
Voila!
You can see it doesn't show on the inside of the card.

Now you know how it is done. If you have any questions leave me a comment. I will be posting my other bow tying method tomorrow.