
I think I have a new obsession. 2x4 crafts. They are so cheap and easy and I keep thinking of new ways to incorporate them into each season. I made some Halloween blocks and then when I went to TX for my sisters weekend I fell in love with my sister's Thanksgiving blocks. I ended up making two sets of Thanksgiving blocks. One was for one of my other sisters and then I made myself a set. Her colors are a little different than mine to match her decor better.


I made my blocks at my craft group and my husband was wonderful and cut all the craft group ladies' blocks for them. We have a Jeep and a chop saw so I volunteered him :) Below is a supply list.
If you have any questions please leave me a comment. Or if you like what you see or have any other 2x4 craft ideas let me know. I love to hear from you.

1 2x4 will make 2 sets of blocks.

I made my blocks at my craft group and my husband was wonderful and cut all the craft group ladies' blocks for them. We have a Jeep and a chop saw so I volunteered him :) Below is a supply list.
- 2x4 cut (3) 3.5in, (4) 5in, (3) 6in
- Chop Saw (if you don't have one, Home Depot can make the cuts for you. Sometimes they charge you and sometimes they don't. It just depends on the person helping out :) it doesn't hurt to leave your husband at home and wear a cute outfit.)
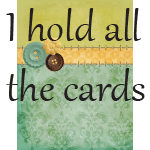
- 12x12 scrapbook paper. Mine are 3 1/4in wide and then 1/4in smaller than the block length.
- cardstock or Vinyl letters. I printed my letters onto cardstock and cut them out. Then I used a black marker to make the cut edges black.
- Foam brush
- Primer
- Brown Paint (use any brand except the Joanns store brand, it is really watered down)
- scissors
- mod podge
- Paper cutter
If you have any questions please leave me a comment. Or if you like what you see or have any other 2x4 craft ideas let me know. I love to hear from you.


4 comments:
How do you sand the blocks on top and bottom so that they are smooth?
Good question Tanya. I used a heavy duty sand paper. One that had a thicker grit. I just sanded it by hand. Then after it was smooth I used a lighter sand paper. After I primed and painted the blocks it really gave them a nice finished look. Some of my blocks were a little rough on the cut edges but I just picked the best side to have as the top part that shows. Thanks for the question and let me know if I was clear. ~Brielle
Love this project! Went to have my wood cut today and when I got home I was one block short. I looked at the picture and realized there are actually 10 blocks of wood, not 9. I think there are (4) 5" blocks, not 3 like it says in the tutorial. I will go back and have 1 more block cut so I can finish. SO cute!!
Thank you for letting me know. I'll fix that.
Post a Comment